
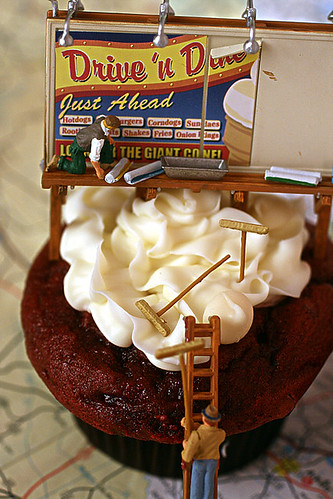
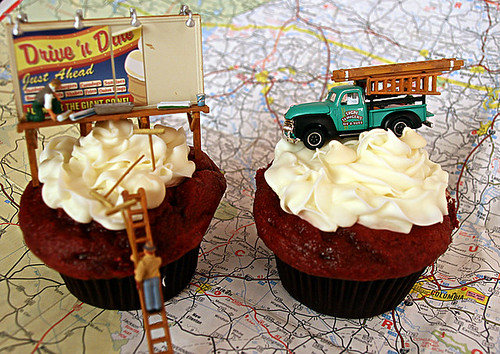
Billboard painting takes place wherever there is something to advertise...and these guys are sharing their work on these red velvet cupcakes!

A red velvet cake was a signature dessert at the Waldorf-Astoria Hotel in New York City during the 1920s. According to a common urban legend a woman once asked for the recipe for the cake, and was billed a large amount. Indignant, she spread the recipe in a chain letter!
This recipe is from Anne Byrn's Cupcakes From the Cake Doctor.
Here's the recipe from the Cake Mix Doctor!
"Red velvet cupcakes take a beloved traditional recipe and make it even more flavorful. Yes, the cupcakes are the de rigueur red, but they are filled with mini chocolate chips to bring out the chocolate flavor. To complement the color and the flavor, I've paired them with a white chocolate frosting, delicately seasoned with peppermint. Recipe is from Cupcakes from the Cake Mix Doctor, page 36."
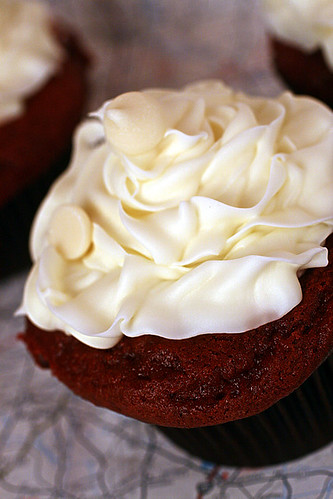
Red Velvet Cupcakes
24 paper liners for cupcake pans (2 1/2 -inch size)
1 package (18.25 ounces) plain German chocolate cake mix
1 package (3.4 ounces) vanilla instant pudding mix
1 cup sour cream (see "the Cupcake Doctor says")
1/2 cup water
1/2 cup vegetable oil
1 bottle (1 ounce) red food coloring
3 large eggs
1 cup miniature semisweet chocolate chips
White Chocolate Peppermint Cream Cheese Frosting (see below)
1. Place a rack in the center of the oven and preheat the oven to 350 degrees F. Line 24 cupcake cups with paper liners. Set the pans aside.
2. Place the cake mix, pudding mix, sour cream, water, oil, food coloring, and eggs in a large mixing bowl. Blend with an electric mixer on low speed for 30 seconds. Stop the machine and scrape down the sides of the bowl with a rubber spatula. Increase the mixer speed to medium and beat 2 minutes more, scraping down the sides again if needed. The batter should look thick and well combined. Fold in the chocolate chips. Spoon or scoop N cup batter into each lined cupcake cup, filling it three quarters of the way full. (You will get between 22 and 24 cupcakes; remove the empty liners, if any.) Place the pans in the oven.
3. Bake the cupcakes until they spring back when lightly pressed with your finger, 18 to 20 minutes. Remove the pans from the oven and place them on wire racks to cool for 5 minutes. Run a dinner knife around the edges of the cupcake liners, lift the cupcakes up from the bottoms of the cups using the end of the knife, and pick them out of the cups carefully with your fingertips. Place them on a wire rack to cool for 15 minutes before frosting.
4. Meanwhile, prepare the White Chocolate Peppermint Cream Cheese Frosting.
5. Place a heaping tablespoon of frosting on each cupcake and swirl to spread with a short metal spatula or a spoon, taking care to cover the tops completely. Place these cupcakes, uncovered or in a cake server, in the refrigerator until the frosting sets, 20 minutes. The cupcakes are ready to serve.
Store the cupcakes, in a cake saver or under a glass dome, at room temperature for up to 3 days or in the refrigerator for up to 1 week. Or freeze them, wrapped in aluminum foil or in a cake saver, for up to 6 months. Thaw the cupcakes overnight in the refrigerator before serving.
The Cupcake Doctor Says
Use reduced-fat sour cream, and you'll sacrifice only fat and calories, not flavor. If you can't find plain German chocolate cake mix, buy the pudding in the mix version and forgo the added pudding. For more chocolate flavor, use chocolate pudding mix instead of vanilla, but the cake won't be as red in color.
(I just made White Cream Cheese Frosting)
White Chocolate Peppermint Cream Cheese Frosting
Makes 3 cups, enough to frost 24 cupcakes (2 1/2 inch size) generously
Preparation Time: 10 minutes
6 ounces white chocolate, coarsely chopped
4 ounces (half an 8-ounce package) reduced-fat cream cheese, at room temperature
4 tablespoons (1/2 stick) butter, at room temperature
1 teaspoon peppermint extract
2 to 2 1/2 cups confectioners' sugar, sifted
1. Place the white chocolate in a small glass bowl in the microwave oven on high power for 1 minute. Remove the bowl from the oven and stir with a wooden spoon or rubber spatula until it is smooth. Set the chocolate aside to cool.
2. Place the cream cheese and butter in a large mixing bowl. Beat with an electric mixer on low speed until well combined, 30 seconds. Stop the machine. Add the melted white chocolate and blend on low speed until just combined, 30 seconds. Add the peppermint extract and 2 cups of the confectioners' sugar and blend on low until the sugar is incorporated, 30 seconds more. Increase the mixer speed to medium and beat until the frosting is fluffy, 1 minute more, adding up to 1/2 cup more sugar if needed to make a spreadable consistency.
Feel free to fold in up to 1/2 cup crushed peppermint candy for a crunchy and creamy frosting!


these are too adorable!
ReplyDeleteOMG! What cute cupcakes! I love the billboard and the map was an especially nice touch! Keep up the great work!
ReplyDelete-Jenniffer
http://cupadeecakes.blogspot.com
This comment has been removed by the author.
ReplyDeleteThis is so cool! Nice work :)
ReplyDeletelook beautiful, good work...
ReplyDeleteA kiss from Spain
Cute!
ReplyDeleteRan across your page because I am looking for an organic and healthy cupcake recipe for my 1 yr old nephew. If you find one and try it I would love to know! I am looking through your archives to see if you have any.
Amanda
OMG!! THese are SO cute!! :)
ReplyDelete